
Productionalizing a machine learning model can sometimes be the most difficult part. You’ve spent weeks gathering data, engineering features, training and tuning your model - only to be stuck with no way to run inference in real time.
This article will cover the basics on how to deploy your model with FastAPI and Azure. Some finer details are purposefully not covered (see caveats section at the end), but by the end you’ll be able to deploy a quick and dirty wrapper for a model on Azure using basic CI/CD.
Project Structure
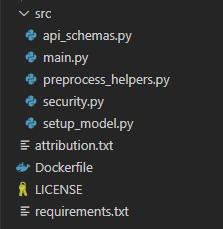
The project structure is as follows. The various files will be explained throughout the article, but full github repo is available as well (link at the end).
Modeling
Hugging Face Tokenizer and Model Download
First we need a model to deploy. The Hugging Face Transformers library allows for quickly and easily downloading a pretrained model. The model is a sentiment classification model - expected to return positive, negative, or neutral based on the classified sentiment of a text string. For more details, see the twitter roberta base docs on Hugging Face.
The code to download the model is be separated into its own file setup_model.py as follows:
from transformers import AutoTokenizer
from transformers import AutoModelForSequenceClassification

def download_model():
    task='sentiment'
    MODEL = f"cardiffnlp/twitter-roberta-base-{task}"

    tokenizer = AutoTokenizer.from_pretrained(MODEL, cache_dir='./pretrained')
    model = AutoModelForSequenceClassification.from_pretrained(MODEL, cache_dir='./pretrained')

    return tokenizer, model


if __name__ == '__main__':
    tokenizer, model = download_model()
    print('main download completed.')
First we import a tokenizer and the sequence classifier model from the transformers library. This particular model has a few different models/use cases - sentiment is specified to build the model string and then download the pretrained tokenizer and model to return as a tuple. The cache directory is overridden to keep the files handy in our project directory.
Instantiating the model is then as simple as calling this function. We store the labels in a list for later use as well:
# Ready model - model download cached during docker build
tokenizer, model = download_model()

# Label values from repo, hardcoded for runtime
labels=['negative', 'neutral', 'positive']
Text Preprocessing
As defined in the model docs, simple preprocessing is required before model inference can be performed. This function was provided in the docs, and slightly modified for our purposes and stored in preprocess_helpers.py:
def preprocess(text: str) -> str:
    """Function provided by model developer to replace specific words prior to tokenization.

    Args:
        text (str): Input text string to normalize.

    Returns:
        str: String after processing with text substitutions.
    """
    new_text = []

    for t in text.split(" "):
        t = '@user' if t.startswith('@') and len(t) > 1 else t
        t = 'http' if t.startswith('http') else t
        new_text.append(t)
    return " ".join(new_text)
Model Inference
To perform model inference on a user provided list of strings - we first preprocess each text string and use the tokenizer to encode the text input (note padding is enabled and ‘pt’ is utilized to return pytorch tensors). Next, the encoded inputs are run through the pytorch model, a softmax function to normalize probabilities, and converted to a python list object. Finally, an output dictionary is created which zips together the input list of text strings with scores along with adding user friendly text labels.
This code will form a substantial basis of the main post api built in the next step.
# Process user input strings - make required string subs and tokenize
user_input_list = input_data.input_text_list
processed_user_input_list = [preprocess(single_input_string) for single_input_string in user_input_list]
encoded_input = tokenizer(processed_user_input_list, padding=True, return_tensors='pt')

# Run through model and normalize
with torch.no_grad():
    scores = model(**encoded_input)[0].detach().numpy()
scores_normalized = softmax(scores, axis=1).tolist()

# Bind to original data (input text after processing: scores)
output_dict = {}
for text, scores in zip(processed_user_input_list, scores_normalized):
    scores_dict = {k:v for k,v in zip(labels, scores)}
    output_dict[text] = scores_dict
FastAPI
FastAPI is a python API framework that allows you to build APIs primarily through type hinting and function decorators. These concepts are likely already familiar with data scientists, so picking up these concepts is doable for the hobbyist or practitioner.
Request and Response Schemas
In order to formalize how data needs to be received and returned by the API, FastAPI uses pydantic. This allows specifying the data types for each property and auto generates useful API docs as well.
TextClassificationInput defined how the api expects to receive data in. A list of strings fits our inference pipeline defined in the modeling stage.
ResponseDict defines how the api will return data back to the caller. In this case a nested dictionary - an outer layer output to allow for more flexibility in later enhancements, which has input strings as nested keys and labels: scores as various properties within. Finally, using a nested config class with schema defined allows an example to be rendered in the docs.
Both of these are stored in the api_schemas.py file:
from pydantic import BaseModel


# Define input and output schema
class TextClassificationInput(BaseModel):
    input_text_list: list[str]


class ResponseDict(BaseModel):
    output: dict[str, dict[str, float]]

    class Config:
        schema_extra = {
            "example": {
                "output": {
                    "Great food!": {
                        "negative": 0.0030399556271731853,
                        "neutral": 0.02544713392853737,
                        "positive": 0.9715129137039185
                    },
                    "Horrible food!": {
                        "negative": 0.974818229675293,
                        "neutral": 0.020662227645516396,
                        "positive": 0.004519559442996979
                    }
                }
            }
        }
Basic API Key Security
There are various security schemas possible, but for this example a simple API key sent in a request header will be used to authenticate. FastAPI provides an APIKeyHeader function in the security module and x-api-key is passed in the name. A function tests the value passed in by the user to ensure it is in a preapproved list, returning an unauthorized error if not. This helper function can then be used in our main api definition - anywhere an endpoint depends on this function will be required to authenticate using x-api-key in the header with a valid key.
Note: this likely isn’t good enough - see caveats section at the end, dynamic tokens along with traffic restrictions provide a better security. For this example, a simple API auth will do.
The security.py code is as follows:
from fastapi.security import APIKeyHeader
from fastapi import HTTPException, status, Security

# API Keys - this would in a real app be stored elsewhere, not hardcoded (example only)
api_keys = ['abc123']
security_scheme = APIKeyHeader(name="x-api-key")

def auth_api_key(input_api_key_string: str = Security(security_scheme)):
    if input_api_key_string not in api_keys:
        raise HTTPException(
            status.HTTP_401_UNAUTHORIZED,
            'Invalid api key'
        )
Main API File
Now it’s time to tie all this together. Library imports along with the above modules are defined as follows:
import torch
from scipy.special import softmax
from fastapi import FastAPI, Security
from src.preprocess_helpers import preprocess
from src.setup_model import download_model
from src.api_schemas import TextClassificationInput, ResponseDict
from src.security import auth_api_key
The app object is initialized and tokenizer + model downloaded:
# Start up app
app = FastAPI()

# Ready model - model download cached during docker build
tokenizer, model = download_model()

# Label values from repo, hardcoded for runtime
labels=['negative', 'neutral', 'positive']
Defining a endpoint in FastAPI is as simple as using a decorator. For example, if we wanted to return a simple hello world response at the root path, we might do something like this:
@app.get("/")
def read_root():
    return {"Hello": "World"}
In our example, we want to perform model inference as long as a proper API key is used:
@app.post('/score/', response_model=ResponseDict)
def score(input_data: TextClassificationInput, api_key: str = Security(auth_api_key)):

    # Process user input strings - make required string subs and tokenize
    user_input_list = input_data.input_text_list
    processed_user_input_list = [preprocess(single_input_string) for single_input_string in user_input_list]
    encoded_input = tokenizer(processed_user_input_list, padding=True, return_tensors='pt')

    # Run through model and normalize
    with torch.no_grad():
        scores = model(**encoded_input)[0].detach().numpy()
    scores_normalized = softmax(scores, axis=1).tolist()

    # Bind to original data (input text after processing: scores)
    output_dict = {}
    for text, scores in zip(processed_user_input_list, scores_normalized):
        scores_dict = {k:v for k,v in zip(labels, scores)}
        output_dict[text] = scores_dict

    return {'output': output_dict}
This code is the same as we’ve built in prior steps, with the following key points:
- app.post: This decorator defines the function can be called with an API POST request. Note in the decorator we define the path, /score/ as well as the response defined using pydantic.
- input_data: This parameter is what is passed in by the user making the API call. The schema is also defined by pydantic from the prior step. api_key utilizes a dependency to the security function that checks for valid tokens.
- return method: Simply returning our dict (which conforms to the specified response model), FastAPI converts into a valid response with status code included.
Docker
With our app defined, how can we wrap this into an environment to test? Docker allows for containerizing the application, simplifying and adding flexibility for deployment. A Dockerfile is created, at a high level performing the following steps:
- Start with a base python image.
- Install dependencies defined in a requirements.txt file.
- Copy over all our modules (a combination of all the python code so far).
- Kick off our model download, as this may be time intensive.
- Run our app using the uvicorn server.
FROM python:3.10-slim

# Install requirements
COPY requirements.txt app/requirements.txt
WORKDIR /app
RUN pip install -r /app/requirements.txt
COPY ./src /app/src
RUN mkdir /pretrained

# Kick off download
RUN ["python", "src/setup_model.py"]

EXPOSE 8000

CMD ["uvicorn", "src.main:app", "--host", "0.0.0.0", "--port", "8000"]
This can be tested locally, and verified that the API is indeed returning a response. Some helpful docker commands are build and run, examples as follows:
docker build -t transformer_testing .
docker run -d -p 8000:8000 transformer_testing
Azure
Container Image
Great - the container works locally, but how can we deploy all this to Azure? From a simple standpoint, a combination of Azure containers and app service is used. For the container portion, an Azure Container Registry allows you to define and build containers. An automated CI/CD approach based on Github webhooks can be utilized to speed up pace of development. In your repo with all code included so far, a personal access token can be provided to Azure to allow for this automated update - whenever a commit is made to the repo, a new container is kicked off in Azure.
The process is as follows:
- Azure Container Registry: Setup Azure Container registry through the Azure portal. You will be asked a few steps such as which resource group to utlize, but the setup is straightforward.
- Obtain a personal access token: In github, you can generate a personal access token. Adding permissions for code, commit status, metadata, and webhooks provided sufficient permissions for Azure. This code will be used in the next step setting up the CI/CD process to build a container automatically in Azure when a new commit is made in github.
Once container registry is setup and personal access token in hand, creating a task can be accomplished through the Azure shell as follows (creating the task and then running it one-off before automatic updates):
ACR_NAME=<registry-name>        # The name of your Azure container registry
GIT_USER=<github-username>      # Your GitHub user account name
GIT_PAT=<personal-access-token> # The PAT you generated in the previous section
GIT_REPO=<repo-name>            # Name of the repo

az acr task create \
    --registry $ACR_NAME \
    --name taskdeployoncommit \
    --image fastapi:{{.Run.ID}} \
    --context https://github.com/$GIT_USER/$GIT_REPO.git#main \
    --file Dockerfile \
    --git-access-token $GIT_PAT

az acr task run --registry $ACR_NAME --name taskdeployoncommit
App Service
Once the container is defined, the app can be deployed directly using this container. When navigating to Azure App Service, there is an option during creation to select a container as the method of build.
App Service allows you to build a web app quickly using the container to do so. A URL is provided that you can use to test out API calls.
Helpful Azure Docs
I won’t include screenshots for each step in setting up a container registry and app service, as many of the selections are intuitive (and UI subject to change), but if you get stuck on any of the above steps - the following Azure walkthroughs are very helpful:
Once the app is deployed, you can test it out using a simple curl command:
curl -X POST https://SITE_NAME.azurewebsites.net/score/ -H "x-api-key: abc123" -H "Content-Type: application/json" -d "{\"input_text_list\": [\"Great food!\", \"Horrible food!\"]}"If all works as expected, you should get a response back that classifies the input texts with associated probabilities:
{"output":{"Great food!":{"negative":0.003039952600374818,"neutral":0.025447113439440727,"positive":0.9715129137039185},"Horrible food!":{"negative":0.974818229675293,"neutral":0.020662210881710052,"positive":0.004519557114690542}}}Summary
Start to finish, we downloaded a pretrained Hugging Face model, wrapped it in a containerized API, and deployed to Azure using basic CI/CD to iterate. This is not the only approach by any means! Caveats below…
Caveats
- Not the only way: There are services such as Azure ML, Databricks, and others which handle a lot of the technical pieces (and in a better way). There are also many other API frameworks than FastAPI which can be utilized as the API wrapper. Finally, there are services that focus on deep learning deployments that may be better suited for large models and performance.
- Security: We used a simple APIKey method. There are additional concerns that need to be taken into account such as where traffic is coming from, user based authentication, services such as Azure Front Door, etc to allow for better security.
- Performance: Scaling may be better achieved through clusters (using a distributed containerized deployment such as Azure Kubernetes Service) or managed services. Load balancers and caching are also considerations not addressed here. Additionally, in this setup a single uvicorn instance is used - while a multiple worker setup could increase concurrency.
- Do you really nead real time inference?: Many problems can be solved in batch rather than exposing an API. In those cases, this type of setup likely isn’t needed.
- SWE/Ops Expertise: I’m certainly not an expert on Software Engineering or Ops. I’m sure there are pieces I’ve missed - include the SWE/MLE/ML Ops expertise as needed, particularly if this is a production deployment.
All examples and files available on Github.